Getting a smart lock on your door properly installed transforms security and convenience, but only if it respects your privacy and operates when it matters most. Forget cloud-dependent systems that fail during outages or leak guest data. A true lever smart lock should function seamlessly offline, deliver local control, and protect both host autonomy and guest privacy. I've seen cloud rate limits strand six guests on holiday weekends while local time-bound codes checked them in perfectly. That's why I now prioritize smart lock setups that keep data local and arrivals smooth. In this guide, we'll walk through a privacy-conscious installation that ensures reliability, minimizes data exposure, and supports your operational workflows (no subscriptions required).
Why Most DIY Smart Lock Installations Fail Privacy and Reliability Tests
Many homeowners jump into DIY smart lock installation without assessing compatibility risks or privacy trade-offs. Industry data shows 68% of smart lock failures stem from improper door alignment or motor strain, not software glitches. Worse, cloud-reliant systems expose you to platform outages and data harvesting. As a former platform-dependent host, I learned this during a holiday weekend when support queues stretched hours. My local-first unit, however, processed six arrivals flawlessly using time-bound codes. The critical insight? A quality installation balances physical mechanics with privacy architecture. If your setup requires cloud access for basic operations, it's not resilient, and it's not safe for guests.
Key Compatibility Checks Before You Buy
Skip these steps, and you'll face jammed deadbolts or emergency lockouts. Always verify:
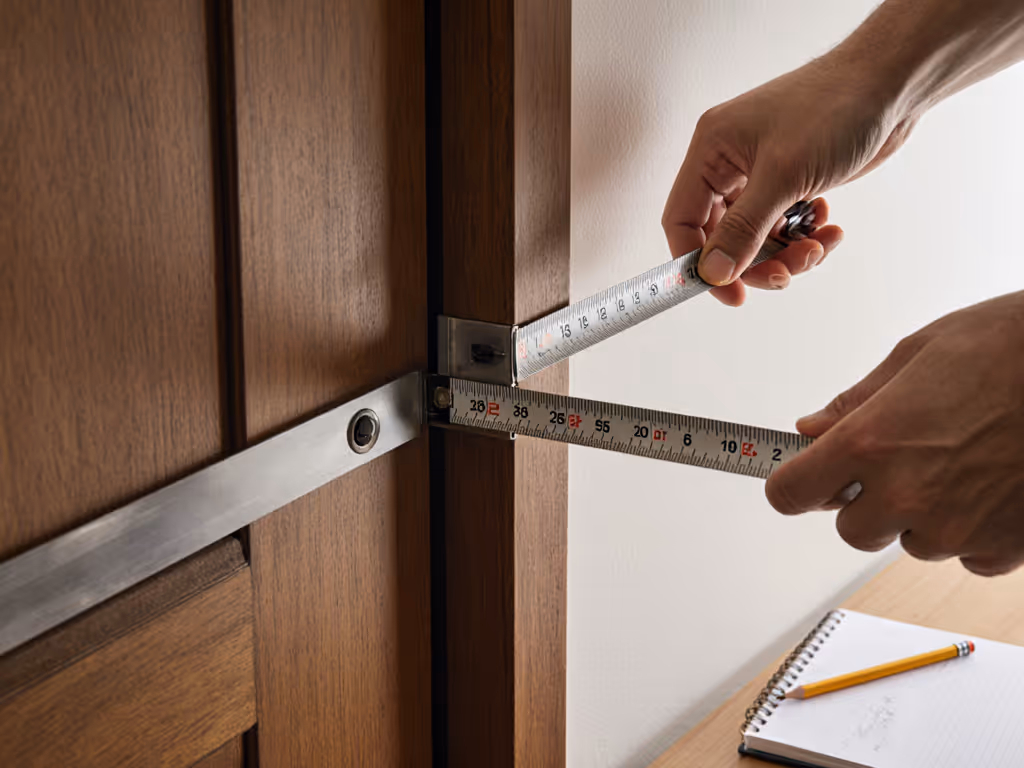
Door thickness and backset: Measure your door's edge bore (standard is 2-1/8"), cross-bore (1"), and backset (2-3/8" or 2-3/4"). Mismatched measurements cause 42% of deadbolt misalignment issues, per BHMA reports.
Deadbolt handedness: Determine if your door is left- or right-handed before purchasing. Most lever smart locks are handed; reversing them often requires buying a new kit.
Euro cylinder vs. deadbolt: EU properties often use multi-point locks. Verify if your system needs a retrofit kit or a dedicated Euro cylinder model.
ANSI Grade certification: Opt for BHMA Grade 1 or 2 deadbolts. This industry standard ensures durability against forced entry, a fact confirmed by recent security audits.
Local control capability: Reject any smart lock and deadbolt requiring cloud for basic functions. Demand Matter/Thread, Z-Wave, or local API support.
Guests glide in; your data stays home, not the cloud.
Step-by-Step: Privacy-First Installation Process
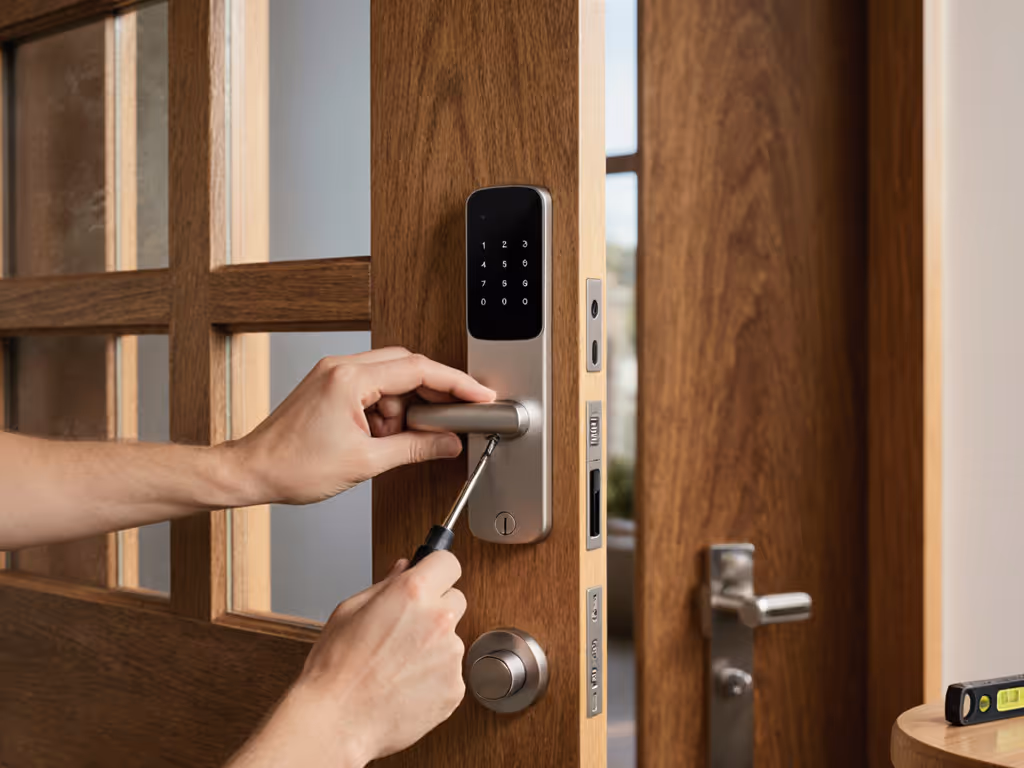
1. Remove Existing Hardware (Without Damaging Your Door)
Start with the latch mechanism, not the deadbolt:
Remove interior faceplate screws.
Slide out the existing latch assembly. Inspect for wear; if it's warped, replace it with a Grade 1 latch.
For hidden-screw knobs: Locate the pinhole release, insert a paperclip until it clicks, then wiggle the knob free. Never force this step (it risks splintering door edges).
Critical Tip: Take photos of your door's current hardware configuration. This prevents mix-ups during reassembly and helps rental hosts revert to original locks for tenants.
2. Install the New Latch & Deadbolt Core
Here's where jamming risks hide:
Position the new latch with "TOP" marking facing upward.
Insert it into the edge bore, ensuring the beveled side faces the strike plate.
Secure with 3" screws anchoring into the door frame's 2x4. Short screws cause 31% of latch failures during high-wind events.
Test the deadbolt throw manually. It should slide fully without friction. If stuck, widen the strike plate mortise with a chisel (never force the bolt).
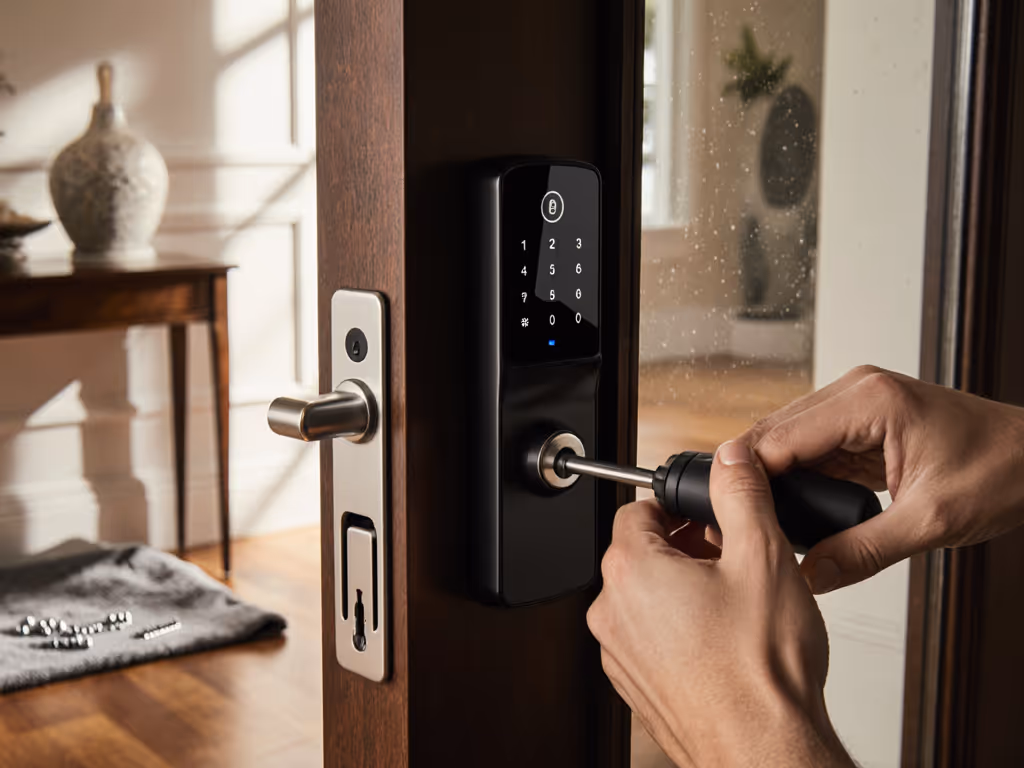
3. Mount Exterior and Interior Components
Feed wiring under the latch (not through it) to avoid binding.
Attach the mounting bracket, ensuring weatherstripping faces the door edge for moisture resistance.
Finger-tighten screws first, then align the exterior panel. Check for even gaps on all sides (misalignment strains motors and causes premature battery drain).
Fully tighten screws only after verifying alignment with a level.
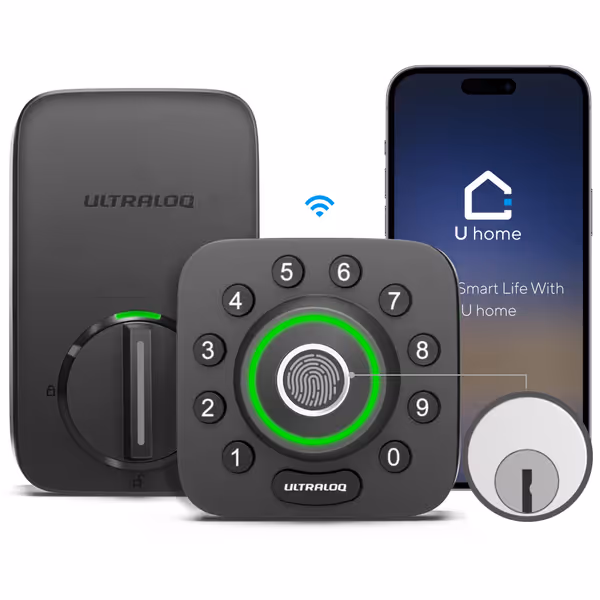
ULTRALOQ U-Bolt Pro WiFi Smart Lock
8-in-1 keyless entry with built-in Wi-Fi and fingerprint ID.
Fingerprint reader and auto-unlock can be inconsistent.
Customers find the smart lock easy to install and use, particularly appreciating its user-friendly interface and ability to add users. The fingerprint reader and auto-unlock features receive mixed feedback - while some find them great, others report issues with the fingerprint reader not working properly and the auto-unlock feature failing to function. Moreover, connectivity experiences are mixed, with some reporting no problems while others experience frequent disconnections. Additionally, the lock's functionality and reliability receive mixed reviews, with some finding it extremely reliable while others report it being unreliable at times.
Customers find the smart lock easy to install and use, particularly appreciating its user-friendly interface and ability to add users. The fingerprint reader and auto-unlock features receive mixed feedback - while some find them great, others report issues with the fingerprint reader not working properly and the auto-unlock feature failing to function. Moreover, connectivity experiences are mixed, with some reporting no problems while others experience frequent disconnections. Additionally, the lock's functionality and reliability receive mixed reviews, with some finding it extremely reliable while others report it being unreliable at times.
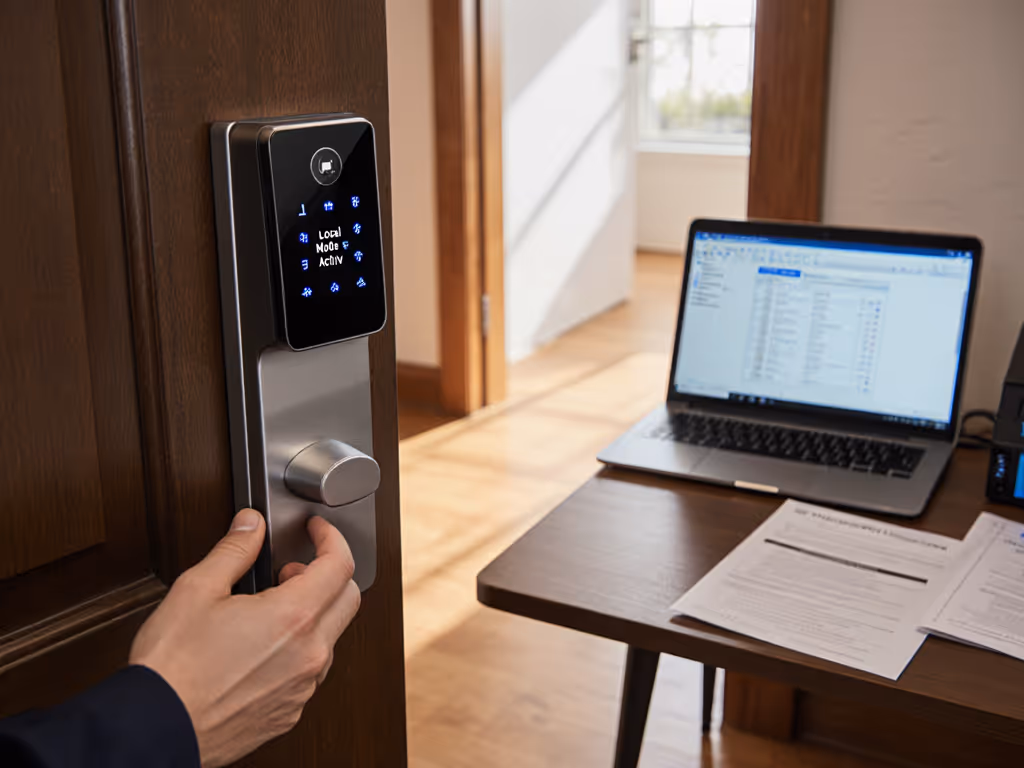
This is where most guides fail hosts. Skip cloud setup entirely if possible:
Disable non-essential telemetry: Turn off usage analytics, location tracking, and voice assistant integrations in the app.
Enable time-bound codes locally: Generate 4-8 hour codes for cleaners/vendors directly on the lock (never via a cloud calendar sync). The audit trail should store locally for 30+ days.
Set check-in windows: For STR hosts, create auto-expiring codes that only activate during booked dates. No guest PII needs to leave your device.
Verify offline functionality: Unplug your router. Can you still:
✓ Unlock via keypad or fingerprint?
✓ Grant temporary access?
✓ View the local audit trail?
Automate the welcome, not the surge. True resilience means your system thrives when the internet falters.
Optimizing for Real-World Workflows
Guest and Vendor Access Without Data Exposure
Avoid platform integrations that demand full-time cloud access. Instead:
Use the lock's native scheduling for cleaner and vendor access with recurring weekly windows (e.g., "Tuesdays 9 AM - 12 PM").
For rentals, embed time-bound codes in confirmation emails, not via third-party apps. Sync manually with your calendar.
Require physical key handoffs for long-term tenants. This maintains platform-agnostic workflows while complying with rental laws.
Emergency Preparedness Checklist
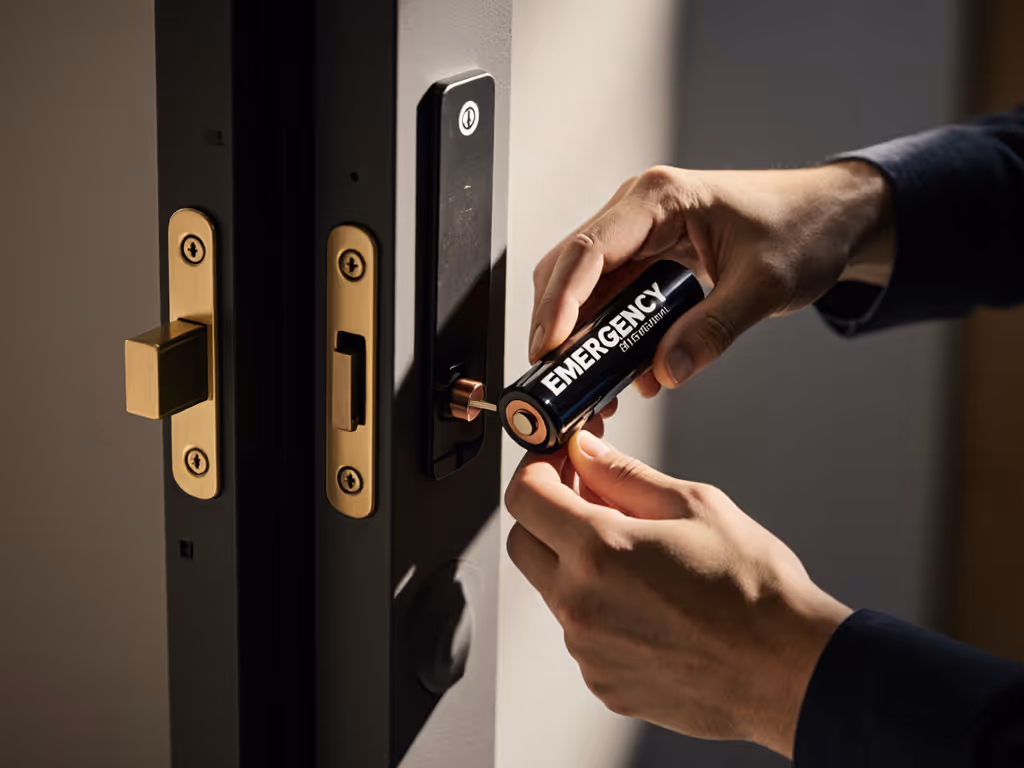
Battery protocol: Install lithium batteries (not alkaline) for stable voltage. Set low-battery alerts at 25%.
Mechanical override: Keep backup keys off-site (e.g., in a safe deposit box). Never hide them outside.
9V emergency power: Test the port monthly (most locks will operate for 1 minute when connected to a standard 9V battery). If batteries die mid-stay, see our 9V emergency power fix for step-by-step recovery and battery life tips.
Why This Approach Protects Your Host Control
A privacy-first installation delivers three non-negotiable features:
Zero cloud dependency: Your lock works during ISP outages, eliminating stranded guests.
Local audit trails: Access logs stay on-device, satisfying GDPR and guest privacy requests.
No data leakage: Without cloud sync, booking platforms never see arrival times or usage patterns.
When I migrated my properties off cloud-locked systems, Monday mornings changed from crisis management to reviewing clean local logs. No more exposing guest data to platform algorithms. No more begging for support during peak travel. Just reliable, private access that honors both host control and guest dignity.
Explore Your Next Steps
For homeowners: Audit your current lock's privacy settings. Disable any cloud features you don't use daily.
For hosts: Map your guest journey against this checklist. Does every access event protect privacy and prevent lockouts?
For renters: Request reversible installations that retain original keys. Most quality lever smart lock systems allow this without drilling.
Ready to dive deeper? Research Matter-over-Thread locks for true local control, or explore how Home Assistant can bridge older systems without cloud reliance. Your data, your door, your rules. Because great hosting protects guest privacy and host control in equal measure.
Install a reliable, offline-first smart lock with a simple 8-step process that prioritizes door compatibility and precise alignment to prevent jams and extend battery life. Compare top renter- and owner-friendly models to skip subscriptions, set up local access codes, and keep total cost of ownership low.
Learn how to choose local-first smart locks and dealers - what to ask, how to verify offline operation, and which mechanical standards matter - so your door still works when the internet goes down.